Back around 110° from the horizontal, seat depth around 16" from front edge to back rest cushion. Or thereabouts. The biggest compromise is that a bench that is narrow enough to sit on comfortably is too narrow to lie on, so you might make up the back depth with deeper, beveled cushions like you guys had behind your backs where you sat on my outdoor system.
6" to 8" Conversion at the seacow
Moderator: matt walker
Re: 6" to 8" Conversion at the seacow
![]() by matt walker » Sat Aug 30, 2014 6:15 pm
by matt walker » Sat Aug 30, 2014 6:15 pm
Seat with cushions around 18" high, maybe a bit more for you there tall guy. Or am I just short? I know the answer to that one. 
Back around 110° from the horizontal, seat depth around 16" from front edge to back rest cushion. Or thereabouts. The biggest compromise is that a bench that is narrow enough to sit on comfortably is too narrow to lie on, so you might make up the back depth with deeper, beveled cushions like you guys had behind your backs where you sat on my outdoor system.
Back around 110° from the horizontal, seat depth around 16" from front edge to back rest cushion. Or thereabouts. The biggest compromise is that a bench that is narrow enough to sit on comfortably is too narrow to lie on, so you might make up the back depth with deeper, beveled cushions like you guys had behind your backs where you sat on my outdoor system.
-

matt walker - Site Admin
- Posts: 1806
- Joined: Tue Jan 03, 2012 5:50 pm
- Location: North Olympic Peninsula
Re: 6" to 8" Conversion at the seacow
![]() by mannytheseacow » Sun Aug 31, 2014 2:31 pm
by mannytheseacow » Sun Aug 31, 2014 2:31 pm
My first bench I made to those standard dimensions and angles. It was ok but I never sit on it in the off season because it's not comfortable to me and my ostrich legs. Guy's idea is great. I love my sofa; it's pretty old now but I keep it around despite the dog smells and stains because it just fits me. It feels like it's hugging me when I sit on it. And like Matt said, this is unusual because it is both comfortable to sit on and lay on.
I gained a futon mattress when I got married, which is also quite comfortable. I'm going to match the dimensions of the couch and incorporate this mattress. I'm sure it will be great when it's warm and hopefully great when it's cool too.
I gained a futon mattress when I got married, which is also quite comfortable. I'm going to match the dimensions of the couch and incorporate this mattress. I'm sure it will be great when it's warm and hopefully great when it's cool too.
"Knowledge is power. Arm yourself."
-

mannytheseacow - Posts: 942
- Joined: Sun Feb 24, 2013 12:40 am
Re: 6" to 8" Conversion at the seacow
![]() by mannytheseacow » Sun Aug 31, 2014 7:52 pm
by mannytheseacow » Sun Aug 31, 2014 7:52 pm
Sorry for the onslaught I questions but there are a few things different about this build that I've not dealt with before.
Mainly, here's my question now: since I'm building this core in place everything is sitting there wet and I don't have the opportunity to dry the core out before building the rest, and the new core sits about 2-3" higher than the surrounding infrustructure (though the 8" tubes are still sitting at the same low elevation). Around the plenum area I'm worried about the strength of everything wet. What does everyone think about casting the riser on this wet mass? I'm worried the back of the core adjacent to the riser might be too weak wet to support the weight of the riser and might collapse back into the plenum.
Also, for this added 6" flow regulator, should I cut a hole in the outer barrel or just try to add a second plenum to the side? Jeez, I just hate to cut a hole in that barrel.
Thanks again for the assistance.
"Knowledge is power. Arm yourself."
-
mannytheseacow - Posts: 942
- Joined: Sun Feb 24, 2013 12:40 am
Re: 6" to 8" Conversion at the seacow
![]() by matt walker » Sun Aug 31, 2014 8:49 pm
by matt walker » Sun Aug 31, 2014 8:49 pm
Yeah, that is a great idea Guy. I have to admit, I skimmed the first time and missed the part about the template of the profile as a cob form tool. That's fantastic man, I'm totally using that.
So, Manny, my considered response to both of your questions is I don't know.
What are you casting the core with? Doesn't really matter, but refractory should set up hard in 24 hours even if it's still got a lot of moisture. Our DIY mix stays fairly soft for a while until you drive the moisture out. If it's the latter, I'd probably try putting a little fan in the thing and run air through it/by it for the next 24 hours and see if you can get it to firm up enough. If you are using the little drum as a canister, perhaps you can span the manifold gaps on both sides of the core with some 2x4's or something to carry some of the riser weight and hold it at height while things set up. Honestly though, I don't know, I'd probably go for it and then swear at it a lot when it sagged. Good luck man.
As for the bypass, I do think it would be a shame to chop up your clean barrel. I see no reason not to build it lower than the barrel in the cob. That sounds like a good way to do it to me.
-
matt walker - Site Admin
- Posts: 1806
- Joined: Tue Jan 03, 2012 5:50 pm
- Location: North Olympic Peninsula
Re: 6" to 8" Conversion at the seacow
![]() by mannytheseacow » Mon Sep 01, 2014 5:43 am
by mannytheseacow » Mon Sep 01, 2014 5:43 am
Thanks for the help. I think I'll do what you said and leave it be for a day and cast the riser tomorrow. I have a fan on it and a dehumidifier running to help out a little. The more I think about it, the plywood mold is pretty well wedged into this core at this point and it will be supporting the riser, almost like a concrete anchor.
I am using a blend for the core. I'm sure I could try harder to find a recipe but just using what I have on hand and winging it. I started at the feed area and added more of the refractory cement but then teased it down towards the back. My reasoning is/was that I wanted the area around the feed to be super tough since that area gets so much abuse and not so worried about the rest. At the front end and down past the trip wire groove in the mold the mix followed this:
38.7% fire clay (by volume)
38.7% vermiculite
19.3% water
1.6% fire cement (dry)
1.6% refractory mortar
0.2% sodium silicate
I excavated the old core out down to the bottom of the burn tunnel and then added another 1"-2" on top of it so there should be around 5"-6" of insulation under the burn tunnel. Perhaps excessive. This bottom layer was 2-3 times higher in percentage of the refractory mortar, and maybe a bit higher in vermiculite too because I couldn't find a good container to mix in. Then I found the right container (I like to mix up small batches, about 4 gallons by volume at a time) and started to use the above mix. As I got past the feed and into the burn tunnel I started leaving out the refractory mortar- gonna save that for another project. I don't know how much of a difference these additions will make to the diy mix- not sure if I was adding a lot or a little.
I got the rest of the demo of the old stove out in about 2 hours- that was the easy part. Got the core cast today, laid the duct work in, fabricated the 8" duct to the old 6" cleanout ports, cut the hole in the chimney for the 8" exhaust and started filling the bench back up. I'm hoping by the end of the day tomorrow I will have all the duct work finished, fabricate the heat exchanger, plumb the water lines, cast the heat riser, and finish cobbing out the plenum, or plenums. I'd like to get a lot more mass back in the bench too but we'll see how far we get. This is where I left off.
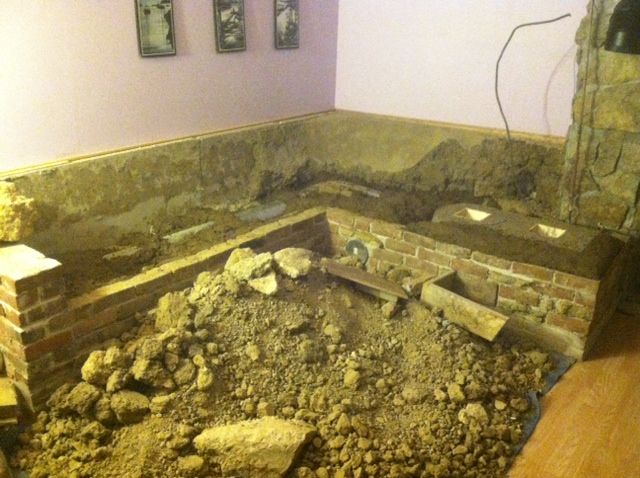
There will definitely be some ongoing bits and pieces to work on- it will be a while yet before it's even cool enough outside to fire it up. so............
I'm really liking these 8" pipes. I didn't realize until I started working with it how much bigger they are. Also, the first time around used that register for the plenum and cut it back a bit- cobbing out the rough shape of it today I can already see that this is going to be so much better.
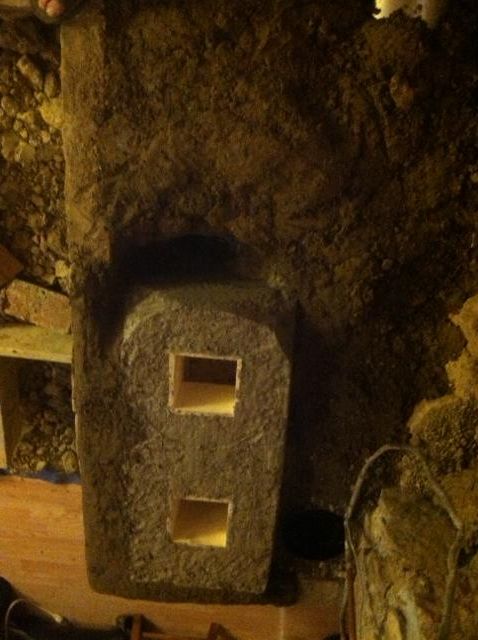
I set the lid from the grease drum over the hole where the riser will go and traced a small groove around it with a knife. Then I cut the wet casting material away to that shape on the two back corners. At first I was cursing myself for trying to cast this thing in place but once I started working on it, it went very well. I took to scraps of 2 x 6 and screwed them together to make an L and this worked great for packing the edges, forming corners, and making straight (ish) lines.
I am using a blend for the core. I'm sure I could try harder to find a recipe but just using what I have on hand and winging it. I started at the feed area and added more of the refractory cement but then teased it down towards the back. My reasoning is/was that I wanted the area around the feed to be super tough since that area gets so much abuse and not so worried about the rest. At the front end and down past the trip wire groove in the mold the mix followed this:
38.7% fire clay (by volume)
38.7% vermiculite
19.3% water
1.6% fire cement (dry)
1.6% refractory mortar
0.2% sodium silicate
I excavated the old core out down to the bottom of the burn tunnel and then added another 1"-2" on top of it so there should be around 5"-6" of insulation under the burn tunnel. Perhaps excessive. This bottom layer was 2-3 times higher in percentage of the refractory mortar, and maybe a bit higher in vermiculite too because I couldn't find a good container to mix in. Then I found the right container (I like to mix up small batches, about 4 gallons by volume at a time) and started to use the above mix. As I got past the feed and into the burn tunnel I started leaving out the refractory mortar- gonna save that for another project. I don't know how much of a difference these additions will make to the diy mix- not sure if I was adding a lot or a little.
I got the rest of the demo of the old stove out in about 2 hours- that was the easy part. Got the core cast today, laid the duct work in, fabricated the 8" duct to the old 6" cleanout ports, cut the hole in the chimney for the 8" exhaust and started filling the bench back up. I'm hoping by the end of the day tomorrow I will have all the duct work finished, fabricate the heat exchanger, plumb the water lines, cast the heat riser, and finish cobbing out the plenum, or plenums. I'd like to get a lot more mass back in the bench too but we'll see how far we get. This is where I left off.
There will definitely be some ongoing bits and pieces to work on- it will be a while yet before it's even cool enough outside to fire it up. so............
I'm really liking these 8" pipes. I didn't realize until I started working with it how much bigger they are. Also, the first time around used that register for the plenum and cut it back a bit- cobbing out the rough shape of it today I can already see that this is going to be so much better.
I set the lid from the grease drum over the hole where the riser will go and traced a small groove around it with a knife. Then I cut the wet casting material away to that shape on the two back corners. At first I was cursing myself for trying to cast this thing in place but once I started working on it, it went very well. I took to scraps of 2 x 6 and screwed them together to make an L and this worked great for packing the edges, forming corners, and making straight (ish) lines.
"Knowledge is power. Arm yourself."
-
mannytheseacow - Posts: 942
- Joined: Sun Feb 24, 2013 12:40 am
Re: 6" to 8" Conversion at the seacow
![]() by matt walker » Mon Sep 01, 2014 3:19 pm
by matt walker » Mon Sep 01, 2014 3:19 pm
Dude! That seriously looks fantastic, I can't thank you enough for taking the time to document it all and keep us posted. It's really cool to see how malleable these set ups are. I mean, yeah, you are working pretty hard there, but it's really no big deal to tear it up and try out new concepts, or strive for a better fit for your living space now that you have experience with the thing. I'm super stoked for you, I'm sure it was hard to throw that pick into it the first time but I think it's going to pay back big time. I'm still on the fence on tearing up my burn chamber, but you are inspiring me for sure. I want a bypass pretty badly, that just seems like a mandatory feature the more experience I get. Not only will it help start up, but if you put a second damper at the end of the the mass run, you can safely shut off the mass and open the bypass when the thing is on it's way out. That way you can plug the mass and store the heat while the core vents any CO outside still. Win, win, win, win.
-
matt walker - Site Admin
- Posts: 1806
- Joined: Tue Jan 03, 2012 5:50 pm
- Location: North Olympic Peninsula
Re: 6" to 8" Conversion at the seacow
![]() by mannytheseacow » Tue Sep 02, 2014 1:26 am
by mannytheseacow » Tue Sep 02, 2014 1:26 am
Thanks for all the encouragement and help. Definitely one of the coolest things about this project is that I can re-use pretty much everything. I mean, if I was remodeling my house using traditional building methods I would have to get a dumpster and the old stuff would get pitched. The cob is totally reusable. Just chop it up with a shovel and add more water- back in action. Definitely malleable.
I didn't get nearly as far as I wanted to this weekend but I did get a lot done and dang I'm whooped. Cast the heat riser today and finished the exhaust duct, along with this secondary airflow deal, and the heat exchanger water loop was fabricated and plumbed in. Even got a little more dirt in the bench, but time to clean up a little and get ready to go back to the grind tomorrow. Basically all the technical work is done, now it's just cobbing.
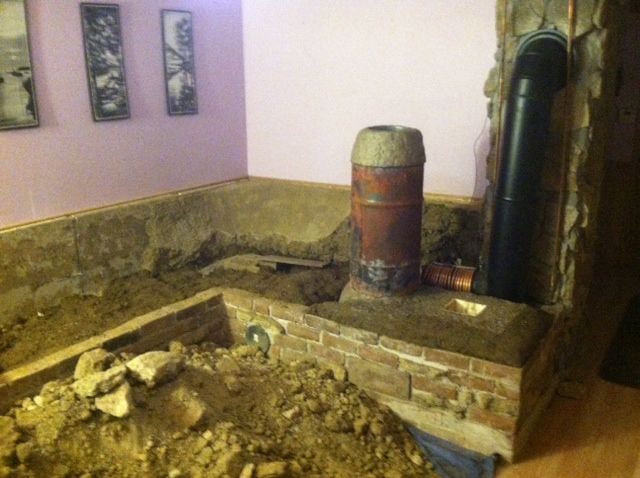
The heat exchanger- stick with me on this one, folks. This worked awesome on the exhaust of my old stove and was a huge failure on my first rocket stove. I think it's gonna work this time. I just have a feeling....
By the way, I hate soldering copper pipes. Absolutely, positively, H A T E it. It takes so long if you do it from scratch and if you don't do it from scratch you've got smashed pipes and dirty connections. Then you turn the water on and there's a leak in the low spot so you have to cut the whole thing apart to get the water out because you can't solder a wet pipe. Aaaarrrrggggghhhh!!!! Stupid copper.
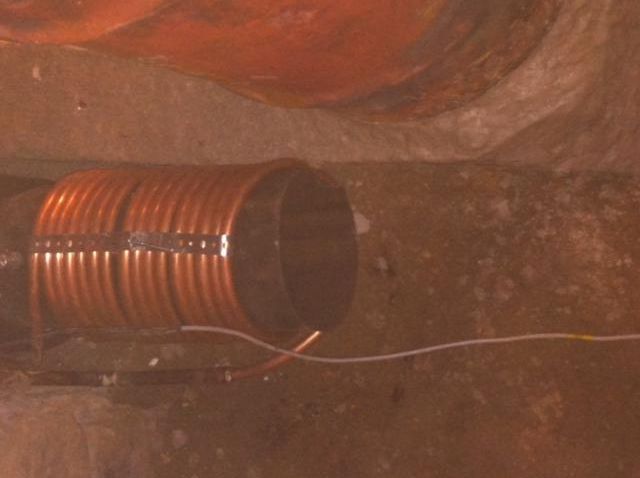
This was the hardest thing I've ever had to solder. It was so tight and that flexible copper kept crimping on me, then trying to get the secondary airflow, with the exchanger attached, matched up to the exhaust at the chimney and plumbed in.... let me just say, I'm glad it's done.
With this secondary air the barrel will sit about 3 1/2" higher than normal. That will give me like a 5-6" gap between the top of the riser and the barrel. That should be ok though, it will just get the barrel hotter, right?
Sorry the pictures are so poor. That room is so dark.
Here's Steve's ode to copper.
I didn't get nearly as far as I wanted to this weekend but I did get a lot done and dang I'm whooped. Cast the heat riser today and finished the exhaust duct, along with this secondary airflow deal, and the heat exchanger water loop was fabricated and plumbed in. Even got a little more dirt in the bench, but time to clean up a little and get ready to go back to the grind tomorrow. Basically all the technical work is done, now it's just cobbing.
The heat exchanger- stick with me on this one, folks. This worked awesome on the exhaust of my old stove and was a huge failure on my first rocket stove. I think it's gonna work this time. I just have a feeling....
By the way, I hate soldering copper pipes. Absolutely, positively, H A T E it. It takes so long if you do it from scratch and if you don't do it from scratch you've got smashed pipes and dirty connections. Then you turn the water on and there's a leak in the low spot so you have to cut the whole thing apart to get the water out because you can't solder a wet pipe. Aaaarrrrggggghhhh!!!! Stupid copper.
This was the hardest thing I've ever had to solder. It was so tight and that flexible copper kept crimping on me, then trying to get the secondary airflow, with the exchanger attached, matched up to the exhaust at the chimney and plumbed in.... let me just say, I'm glad it's done.
With this secondary air the barrel will sit about 3 1/2" higher than normal. That will give me like a 5-6" gap between the top of the riser and the barrel. That should be ok though, it will just get the barrel hotter, right?
Sorry the pictures are so poor. That room is so dark.
Here's Steve's ode to copper.
"Knowledge is power. Arm yourself."
-
mannytheseacow - Posts: 942
- Joined: Sun Feb 24, 2013 12:40 am
Re: 6" to 8" Conversion at the seacow
![]() by matt walker » Tue Sep 02, 2014 5:31 pm
by matt walker » Tue Sep 02, 2014 5:31 pm
So wait. You ran the coil around the bypass section? That is freakin' genius! I think you might have just changed the world man, seriously. The bypass makes so much sense even before the addition of the coil, I was so excited about the concept of damping the mass when the fire is going out, but this....man, talk about stacking functions. So, bypass to start the heater, when the mass is warm, you can continue to run hot to get the quick heat off of the barrel and continue to pull more heat out of the exhaust than would be possible with the already hot clay by running the coil and switching most of the flow through the bypass, thereby heating water. Then, when shutting it down, open the bypass and close the mass. Holy cow man. My mind just exploded.
-
matt walker - Site Admin
- Posts: 1806
- Joined: Tue Jan 03, 2012 5:50 pm
- Location: North Olympic Peninsula
Re: 6" to 8" Conversion at the seacow
![]() by mannytheseacow » Wed Sep 03, 2014 2:37 am
by mannytheseacow » Wed Sep 03, 2014 2:37 am
Yeah! I'm glad you're stoked about it, Matt. I'm excited to see how it works too. I'm thinking that even when it's closed off it will still be a sufficient little chamber to heat some water in since the damper is at the far end closest to the chimney. If I had more room I would be inclined to run a 30 gallon drum horizontally, wrapped in pipe acting as a second bell but with a smaller inlet and outlet port with a damper at the far end. I do t have room though, I checked. 6" pipe is about all that will fit in my space.
So I'm thinking about cobbing out a small chamber around the coil and than filling it with vermiculite since I want the heat to stay in the coil and not necessarily be heating mass there. I don't think clay would be necessary, though there's enough sitting around to do it if you think it would improve things. It so small working I that area that I think loose vermiculite would fill the interstices much better.
Too bad, I really would like the idea of putting a damper on the mass too, but I don't think I have a spot for it with my setup and I'm already passed that part. To get back in there I'd have to undo the copper and I'm definitely not crossing that bridge again. I could easily put one in the chimney but it quite achieve the same goal.
"Knowledge is power. Arm yourself."
-
mannytheseacow - Posts: 942
- Joined: Sun Feb 24, 2013 12:40 am
Re: 6" to 8" Conversion at the seacow
![]() by matt walker » Wed Sep 03, 2014 4:13 am
by matt walker » Wed Sep 03, 2014 4:13 am
Dang, too bad about the mass damper. Anywhere along that 8" line still accessible? Near the barrel? In the bench? I totally understand not going back in there at this point. No worries, I'm for sure going to build a system with that feature soon.
Yeah, that little bypass thing should be great, and I think you will be able to pull some heat out even when heating the bench. I'd for sure insulate as best you can. I think loose fill would be fine, I can't imagine there would be a huge difference either way, clay bound or loose.
Man, seriously, I am excited about what's coming out of this rebuild. I think I'll be tearing into mine before winter hits. Maybe. With a bypass to start I could probably add another 6' of bench or so. Hmmmm.
-
matt walker - Site Admin
- Posts: 1806
- Joined: Tue Jan 03, 2012 5:50 pm
- Location: North Olympic Peninsula
Who is online
Users browsing this forum: No registered users and 103 guests